Adjusting Adobe Premiere Settings
Adobe Premiere offers a plethora of settings, and you could easily spend a day or two trying to sort through them all. Some settings are immediately relevant to your work; some won't be used until you perform more advanced work. The next few sections show you some key settings that help you make more effective use of Premiere on a daily basis.
Setting up your scratch disks
The scratch disk is the disk where you store all of your video stuff. When you capture video onto your computer, you capture it to the scratch disk. Likewise, when you want to preview transitions, timelines, effects, and various edits, they must be rendered. Rendering is where the transitions or effects are actually applied to the clips. The rendered clips are stored as preview files on the scratch disk. The scratch disk is your Premiere storage place — your video data bucket, so to speak.
If your computer has just one big hard drive, then you won't necessarily have a separate scratch disk. Your scratch disk will actually be a folder on your main hard drive. But if you can get a separate hard drive to use exclusively as a Premiere scratch disk, go for it. Because big and fast hard drives are so cheap these days, there is almost no reason to not have a separate scratch disk.
A scratch disk must be not only big, but fast. You'll need a 7200rpm IDE drive at the very least, or if you can afford it, a SCSI drive. If your drive isn't fast enough, you'll drop frames during rendering and when you try to output video to tape.
You can choose different scratch disks and folders for different types of files. Premiere will always use whatever location you specify. To set up your scratch disks, follow these steps:
1. On the Premiere menu bar, choose Edit --> Preferences --> Scratch Disks and Device Control.
The Preferences dialog box appears, as shown in Figure 1.
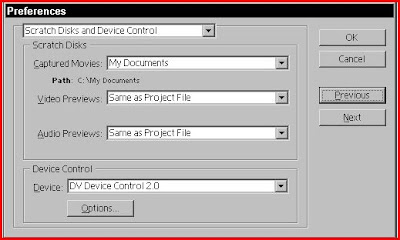
Figure 1: Configure your storage space using the Scratch Disks settings.
2. Use the Captured Movies menu to adjust the scratch disk setting for clips that you capture using Premiere.
When you capture movies from a camera, video deck, or other source, this is where the video files are stored. The default location on a Windows PC is "My Documents." On a Macintosh, the default location is the Adobe application folder on the hard drive where you installed Premiere. To choose a different location, choose Select Folder from the menu. When a standard Browse (Windows) or Finder (Macintosh) dialog box appears, use it to navigate to and select a new disk and folder.
3. Choose a scratch disk for video previews from the Video Previews drop-down menu.
When you want to preview part of your project or the whole thing, Premiere must render a preview file. The default location for these preview files is "Same as Project File," which as the name suggests is the folder where your Premiere Project (.PPJ) file is saved. You can select a different folder if you wish.
4. Choose a scratch disk for audio previews from the Audio Previews drop-down menu.
Audio must also be rendered before it can be previewed.
5. Click OK when you are done adjusting your Scratch Disk settings.
If your computer is on a network, you will be able to choose network drives on other computers when you set up your scratch disks. However, it's not a good idea to use network drives as scratch disks. Most networks are not fast or reliable enough to adequately handle large video files without dropping frames and causing other problems.
Nessun commento:
Posta un commento